On the morning of my most recent birthday, I sat up in bed, yawned, and rubbed the sleep out of my eyes. I walked out to the patio with a cup of coffee, and lo and behold, a $50 bill had sprouted on my money tree.

For updated information on my bare-bones, home aquaponic system, check out my profile at the Aquaponic Source.
"How far can I stretch $50?" I asked, and decided I'd challenge myself to build a thrifty home aquaponic system.
What is an aquaponic system?
Plants are grown hydroponically without soil. Instead of adding fertilizer for the plants, fish live in the water reservoir for the plants. Through the power of the nitrogen cycle, when fish go to the bathroom they supply nutrients for the plants. In return, the plants keep the water clean for the fish.
Some benefits of aquaponic gardening include
- Increased access to fresh veggies and herbs year-round.
- In larger systems, edible fish like tilapia and catfish can be grown.
- Can be easier to maintain than strictly hydroponic systems, aquariums, or aquaculture where fish are grown to eat.
- Vegetables, herbs, and fish can be sold for $$$.
- Can be used in a classroom setting to teach about cycles of matter, communities, mutualism, and more.
To build a bare-bones home aquaponic system, I'd need
- A fish tank -- 10 gal aquarium, $12.97 from Wal-Mart
- Something for the plants to grow in
- 2 foot section of 4 inch PVC pipe, $7.18 from Home Depot
- 2 4-inch PVC endcaps, $4.86
- A pump to push water from the fish tank up to the plants,
- 30-45 gal/hr fountain pump, $16.98 Lowes
- 3 feet of 3/8 inch vinyl tubing, $0.99 Lowes
- An air pump to inject oxygen into the water,
- Aquarium gravel - $3.74 Wal-Mart
- Plants -- grown free from rooted cuttings
- Fish -- a handful of feeder goldfish cost about $1.00 Petsmart
Some other tools that I thought may come in handy included:
- A drill, 1/8-inch and 1/16-inch drill bits
- Caulk and caulk gun
- A hacksaw
Putting the pieces together
 |
| It's a good idea to start with feeder fish |
My first step was to fill the aquarium with water and put in the air pump. The water needed to sit out at least 24 hours to allow chlorine from the tap water to evaporate before it was safe for the fish to live in. After a day passed, I added the fishies.
 |
| Cut a channel |
With the fish in place, the next step was to give the plants some room to grow. I started out by using a hacksaw to cut a 2-inch section of the 4-inch PVC pipe. This step takes some patience, but I promise it's possible to finish. The open section becomes the top of the pipe that the plants will sit in.
Next, I flipped over the PVC pipe and drilled 4 holes on the bottom to one side. The fourth hole that's closest to the end of the pipe was drilled with the larger 1/16-inch bit, and the other holes were drilled with the smaller 1/8-inch bit. I recommend starting with only two or three holes and adding more if needed rather than drilling several and having to plug them up when the plants get too dry down the road.
 |
| Drill drainage holes |
With the channel cut and the holes drilled, it was time to add the end caps. Although an employee at Lowes assured me that no caulk would be necessary for this part, it is. I added a line of caulk along the edge of the PVC pipe, then popped the end caps on.
Once the caulk had dried overnight, it was time to start pumping water. Set the channel on top of the aquarium and partially fill with gravel. Submerge the fountain pump and run the vinyl tubing up into the channel. Secure the tubing with gravel inside of the channel.
I added plants, turned on the fountain pump, and the aquaponic system was complete!
The system has been running successfully for 3 weeks now. I did lose some fishies, but I've also been able to add a couple fancier fish now that the cycling is complete.
Helpful hints:
 |
| The system continues to run smoothly after 2 months |
- A note about the fish: It's a good idea to start off with just a few inexpensive feeder fish that are available at just about any pet store. Don't get too attached to these fishies, because they're probably going to die of ammonia toxicity. To speed up cycling, leave a clean sponge in an established aquarium for a few days. Add the sponge to your tank when you add the fish. This will transfer some of the beneficial bacteria needed for cycling to your system. To learn more about ammonia toxicity, nutrient cycling, and other options to this process, check out the Aquaponic Source's cycling page.
- Another note about fish: Although comet feeder goldfish are great to kick start cycling, I've learned that they aren't great long term residents for this particular system. Comet goldfish have a habit of jumping out of tanks that don't have a lid. There are slightly more expensive fantail goldfish that have shorter bodies and are less likely to be able to build up the momentum required to jump out of the tank. I wouldn't recommend black moor goldfish because they are likely to experience fungus problems. Fish fungus illnesses should be treated with aquarium salt that can stress out your plants.
- A note about worms: Red wiggler worms can be added to the gravel to help break down fish waste. Worms release nutrients for the plants to use and help keep the system clean for the fish.
- A note about PVC: Be sure to remove all the little shavings left over from sawing and drilling. If there are any left, they'll get into the water and the fish will eat them.
- A note about gravel: Be sure to use aquarium gravel and not just any old rocks you happen across. Rocks that contain limestone or seashells can raise pH to dangerous levels for both the fish and the plants. Check out the Aquaponic Source for a simple test to determine if your gravel contains limestone. Another good medium for the grow-bed is Hydroton clay pebbles.
- A note about the fountain pump: The model of pump that I selected was small and inexpensive, but it does not have a filter that protects the pump from getting clogged by fish waste. For the first month or so, I removed the filter weekly and rinsed the intake in a sink. Although that was effective, I scratched together a couple dollars for some filter foam. Using scissors, I cut out a square and placed it under the fountain pump intake. The filter foam should be removed and rinsed every month or so.
- A note about light: My system ran fine for over a month with just the ambient lighting in my apartment, but I grew tired of leaving my office overhead light on all day. I sprung for a small desk lamp and fitted it with a 10 watt fluorescent aquarium bulb. The lamp is plugged into a timer that turns the light on at 7:00 a.m. and off at 8:00 p.m.
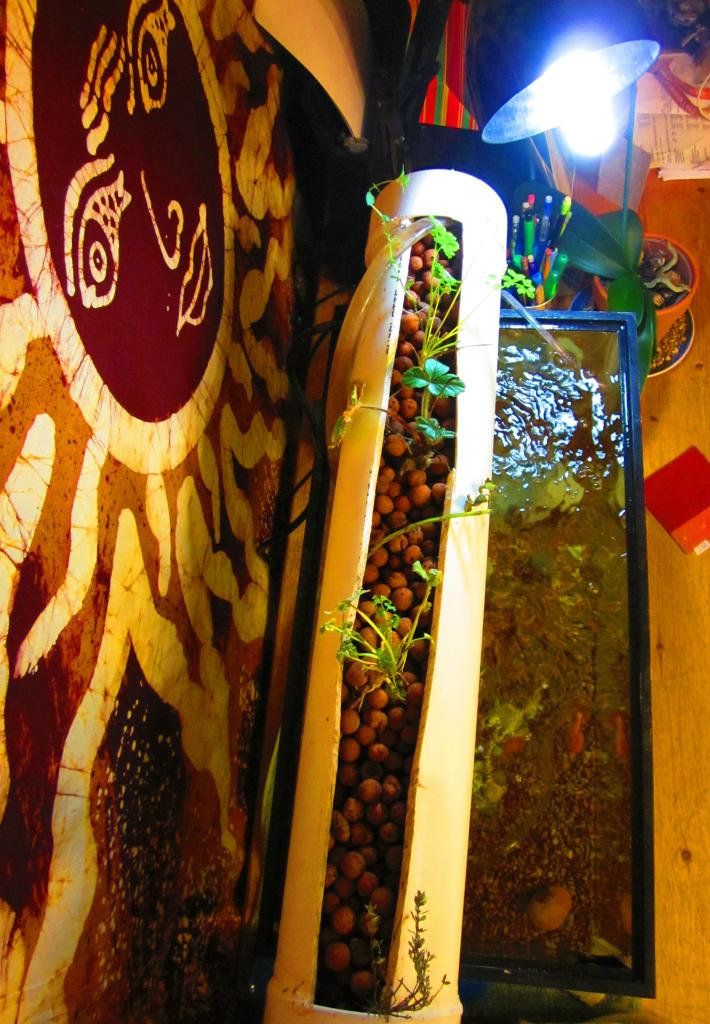
 |
| Side view of the system after 2 months |
To see more photos of my home aquaponic system, check out my photobucket story.
If you have any questions, comments, ideas, or suggestions, I love to get email!
A special thanks to my Dad for giving me an opportunity to do such a neat project on my birthday!
A special thanks to my Dad for giving me an opportunity to do such a neat project on my birthday!
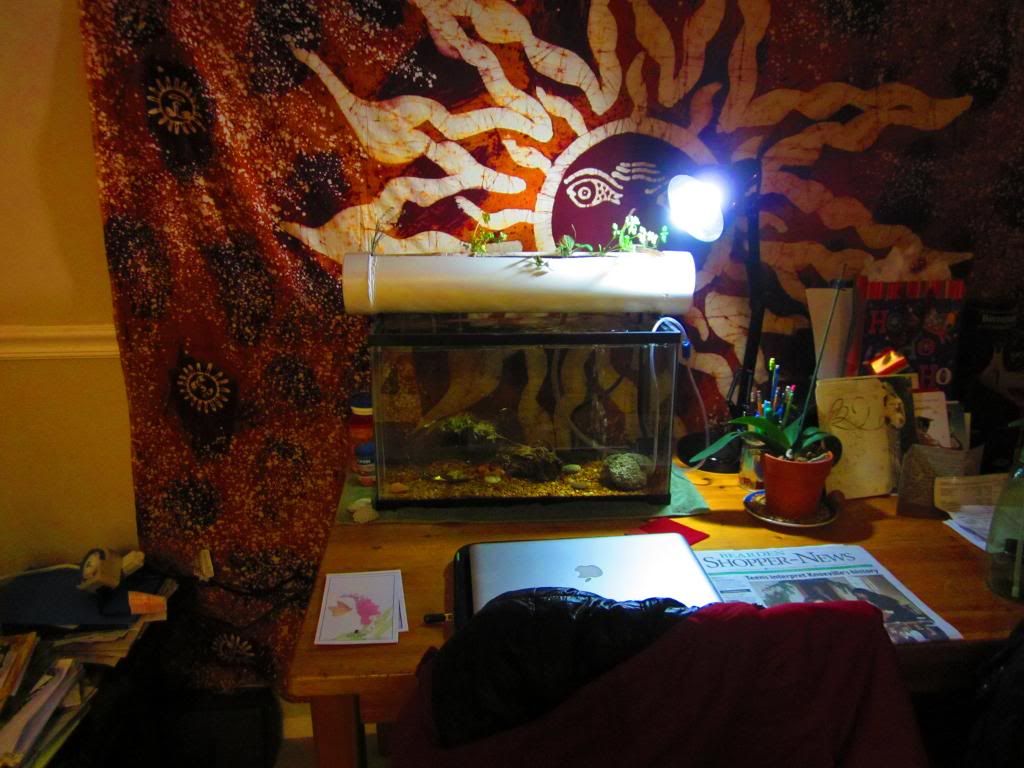 |
| My system continues to run smoothly after 2 months. |

Love this story! Welcome to the aquaponics world..
ReplyDeleteEven cheaper? Look for free or nearly free aquariums on Craigslist or the various freecycle groups that abound. Just make sure to scrub the tar outta them, as they could be coming with snails or fungus. Some bleach, some time in the sun, should help. And you can sometimes find a builder or plumber who might have scraps of tubing or PVC. Other parts could be scavenged from CL's or freecycle too, and you could ask friends and family if they have parts and pieces lying around. Some people are hoarders of just about any random part or bit. You could probably do a set up like this for as little as $20!
ReplyDeleteHi Jennifer!
DeleteThanks for the excellent info about reducing the cost of the system. I hadn't considered searching on Craigslist. That would be a great way to find an even larger aquarium, and maybe even an attractive aquarium stand. Great call on asking a professional for their scraps.
A CALL TO READERS: Somebody should challenge themselves to build this system for less than $20, and post back with info. Very exciting stuff!
It seems like teachers would have an easy time building one for less than $50 as well. Many schools have several old aquariums just lying around in a closet collecting dust. Plus, plumbers, professionals, or even box stores would be open to donating materials for this. I'm of the opinion that a 2' section of PVC should be free for a teacher.
Sorry for the delay responding. I thought blogger would email me about comments, but I guess I was wrong!
Hello!
ReplyDeleteI would love to begin using aquaponics systems and this seems like the perfect place to start :) I looked all over the internet for an easy way to make this happen and here I am!
My question for you is about the plants... were they grown in your aquaponics system from seeds or did you transplant them from a normal planter (with soil) ? If so, how did your plants take to this? And what kind of plants did you use?
Thanks so much!
- Rachel
Thanks for your question Rachel. Sorry for the delay responding.
DeleteI'd have to say pretty much yes to everything. I've grown some from seeds, and I've transplanted some from a normal planter. I've also stuck some stems that have developed roots, and put some little offshoots from another plant that was grown in a container outdoors. I'm pleased to report that there didn't seem to be any "transplant shock". Actually, the plants that were moved from soil seem to really enjoy being in the system with constant water, oxygen, and nutrients.
I have gone through a lot of trial and error with plant selections. My aquaponic system does not receive any natural light from a window -- only some supplemental light from a t-5 fluorescent aquarium bulb. I have grown some herbs, flowers, and veggies, but after a couple months they peter out from lack of exposure. I've moved on to strictly interior plants now, and they seem pretty happy so far. Pothos ivy, peace lily, and Boston fern offshoots are what I have currently, but I think that spider plant, begonia, and other interior plants that have low light needs would do okay.
We have built this system at work, and it receives ample light from a window. Plants in the mint family (mint, lemon balm, etc.) seem to be happiest in here, but I'm sure some other herbs would work. Even rosemary does okay if it gets enough light.
I hope that answers your question. Thanks for writing!
I am way late to the game here but maybe you will still reply, When using seeds do you drop them directly into the aquarium rocks? or do you put them in some sort of soil?
DeleteCongratulations on your project Amanda. It was quite ambitious of you to fabricate your own set up. It's always better when you DIY! I noticed that you had to do a little testing with the types of fish that are used in aquaponic systems. I recommend using Red Wiggler Worms, or Red Worms for short, in my post about aquaponics.
ReplyDeletehttp://bit.ly/1coBVJQ
Glad to connect with you! You should create an update to this post to let readers know that your DIY Aquaponics System is still going strong!
Thanks for your support Cheryl! I was kind of toying with the idea of doing an update, but I wasn't sure if there would be any interest. I'll definitely pursue this in the spring.
DeleteI really enjoyed our post about the Garden Fish Tank. That is a really neat system, and you had a lot of great information about aquaponics as well.
Thanks for reading, ADP
Genius! Great thinking. This is by far the best set up I've seen to get started. I live in an apartment and don't have much space but this will definitely work for me. thanks.
ReplyDeleteThanks so much Amanda for this thrifty design & all the knowledge you shared! I am really drawn to the design here: http://www.mediamatic.net/viewattachment/356425
ReplyDeleteDefinitly won't be as cheap as yours but I am hoping I can get somethings second hand. :) You are an inspiration!
My wife forwarded me this in regards to the aquarium she wishes to set up for herself (lol, typical, I set one up for myself, and suddenly SHE wants to do one. only she'd like to make it full aquaponics deal).
ReplyDeleteI noticed that basically what you've done here is what a lot of aquarium people call an above tank sump. I had just watched a video on making one on youtube yesterday, so when I looked at your blog, the lightbulb went off like "why didn't I think of that!"
One suggestion for the pump fixture getting clogged. You can get yourself a small bit of filter foam, cut a slit part way through it, and fit it over the inlet for the pump (depending on the pump you have.) This would keep the solid waste from clogging the filter (though might defeat the purpose of the aquaponics I guess).
We also have fraud Bible over 37gb of files including everything
ReplyDeleteEverything on UK including Bank Statements and Utility,gta 5 apk
Great build, now you need fish - here is a list of best small aquaponics fish.
ReplyDeletewater pump for sale trinidad
ReplyDelete